
Feld Audio
RELIEF
User Guide · v0.4.0 · AU & VST3
Introduction
RELIEF is a mixing tool that works across tracks instead of on one. Put an instance on every track you want to balance, and each window shows all of them at once as one stacked spectrum — so you can see exactly where two instruments are fighting for the same frequencies, and clear the collision with one knob.
Most EQs show you one track in isolation. The problem in a mix is rarely one track’s curve; it is two tracks occupying the same band at the same level, where neither one sounds wrong alone. RELIEF measures that overlap directly, marks it in the display, and can dip it out of the louder track automatically — leaving room for the quieter one without you hunting for the frequency.
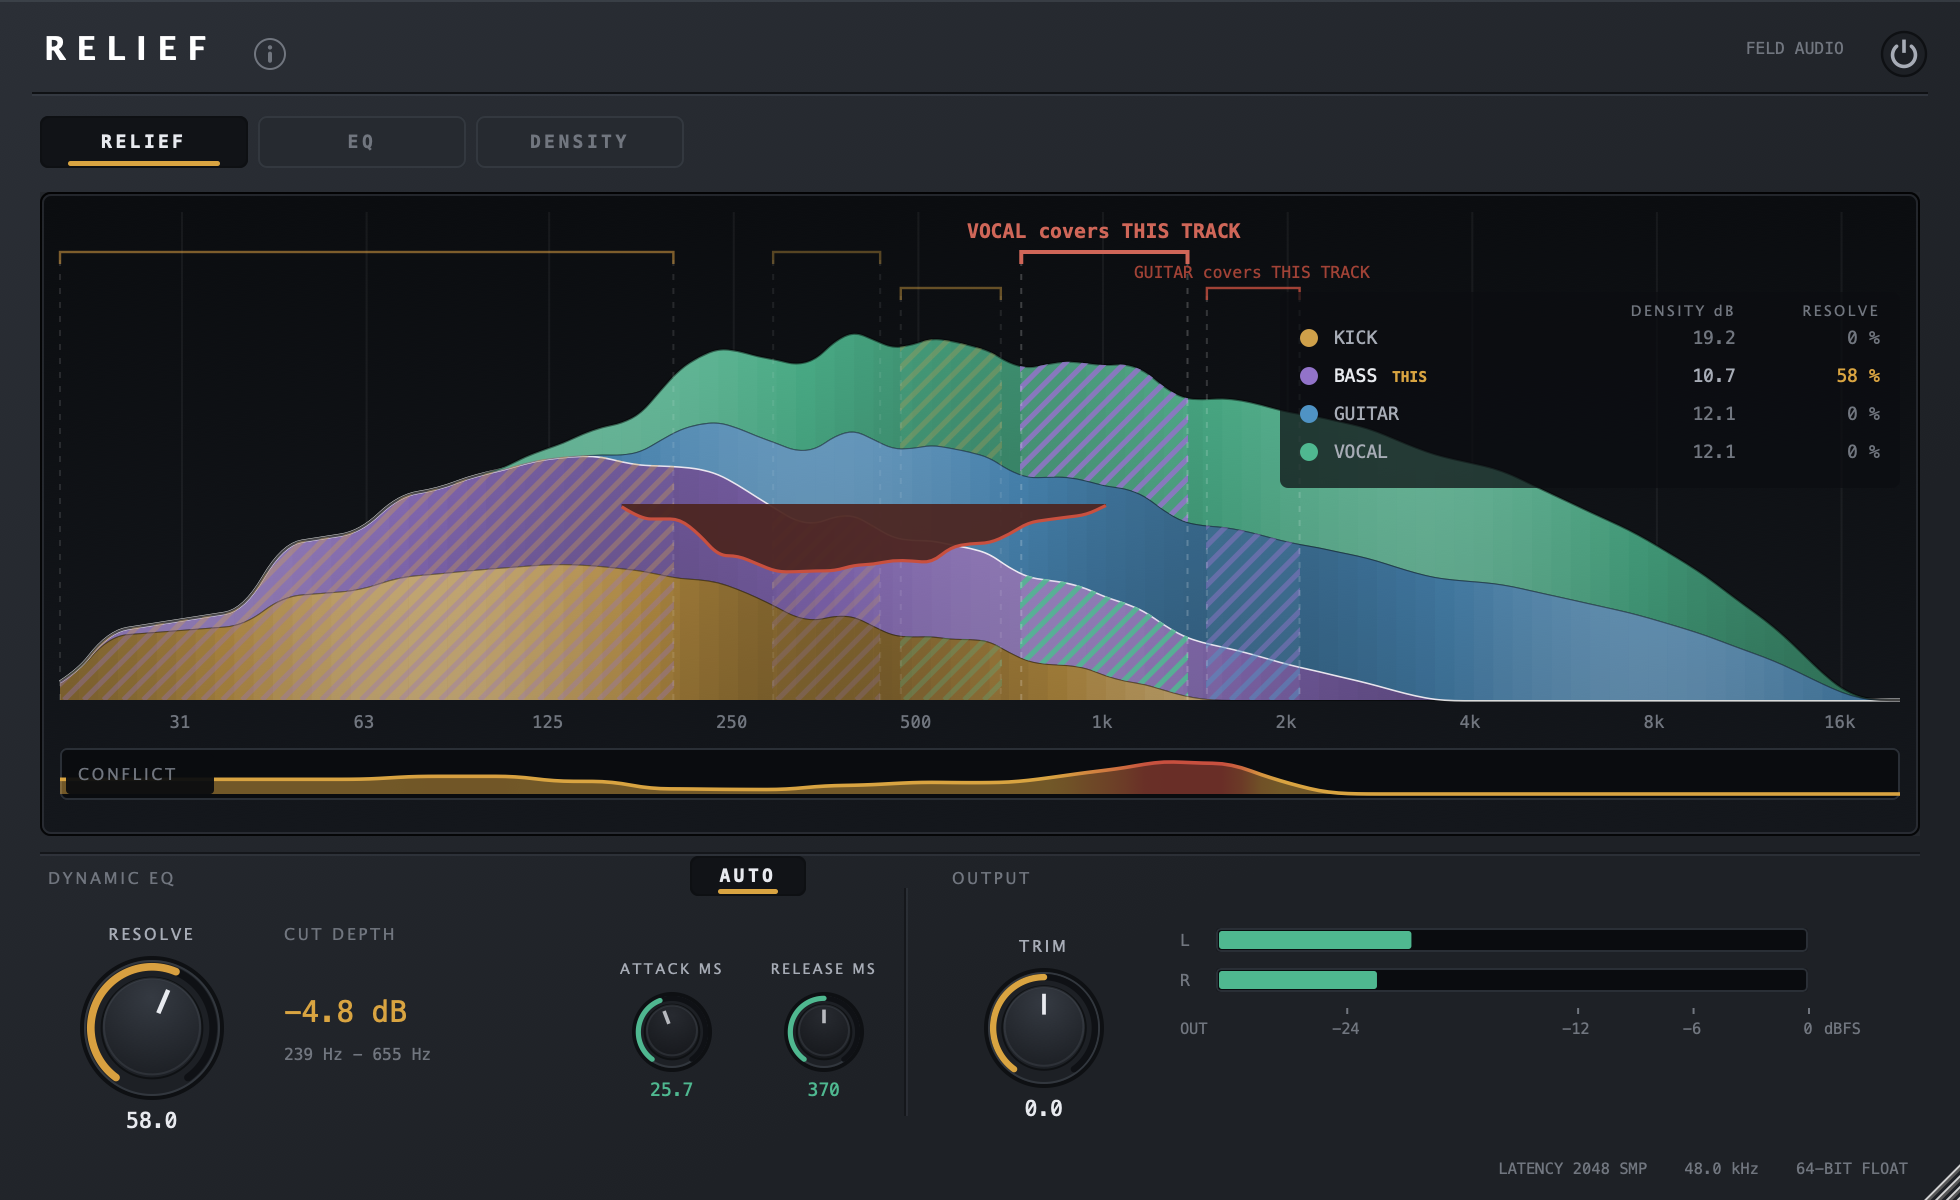 1 2 3 4 5 6 7 8
- Tabs. RELIEF for the overview, EQ for the parametric bands, DENSITY for the transient shaper.
- Conflict bracket. Says in words which track is covering which — VOCAL covers THIS TRACK — over the region where it happens. The worst conflict is drawn in full; the others fade. Click one to fix it.
- Track legend. Every instance in the session, with its density (crest factor) and its Resolve setting; THIS marks the track this window is on.
- The stack. One coloured layer per track, stacked, never overlapping. Your own track is outlined in white.
- Conflict lane. How severe the collision is at every frequency, gold shading to crimson as it gets worse.
- Resolve. The dynamic EQ that carves this track out of the others’ way, with a readout of how deep it is cutting right now and where.
- Resolve timing. How fast those cuts open and close — or AUTO, which takes both from the programme material.
- Output. Trim, and the left/right peak meter on a dBFS scale.
01Install
Run RELIEF-0.4.1-Installer.pkg and follow the prompts. It places both formats where your DAW expects them, so there is nothing to drag anywhere:
- Audio Unit →
/Library/Audio/Plug-Ins/Components - VST3 →
/Library/Audio/Plug-Ins/VST3
The installer lets you deselect either format if you only use one. RELIEF is a universal binary and runs natively on both Apple Silicon and Intel Macs.
Make your DAW notice it
- Logic Pro — quit and reopen Logic. It validates new Audio Units on launch.
- Ableton Live — Settings → Plug-Ins, then hold Option and click Rescan.
- Other hosts — use their plug-in rescan, or simply restart them.
A DAW loads a plug-in into memory once per launch. When you install a new version of RELIEF, quit the DAW completely and reopen it — reopening just the plug-in window will keep showing you the old version.
02First five minutes
- Put RELIEF on the tracks that fight each other. Kick and bass, or vocal and guitars. Two instances is enough to be useful; up to 16 can share one session.
- Play the busiest section. Within a second or two every instance appears in the stack, each in its own colour, named as in your DAW.
- Read the bracket. Where one track is covering another’s important content, a bracket above the stack says so in words — KICK covers BASS — each layer carries the other’s colour as diagonal stripes, and the CONFLICT lane under the axis rises toward crimson. That is where your mix is muddy.
- Click the bracket and turn up Resolve in the panel that opens, until the lane settles back toward gold. The panel holds the Resolve of whichever track has to give way — the one doing the covering — even when that is another track: there is no need to go and find its RELIEF.
- Listen, not just look. Resolve removes what was hidden anyway, so the treated track should barely change on its own while the other one gets clearer in the mix.
Soloing a track stops the other instances from reporting, so the stack collapses to one layer and Resolve goes idle — correctly, since there is nothing left to mask. RELIEF is a tool you use with the mix playing.
03Reading the display
The stack
Each track gets its own solid layer, stacked on the one below, never overlapping — so the total height at any frequency is how much energy the whole group has there, and each band of colour is one track’s share of it. Your own track is outlined in white. Colours come from your DAW where it provides them; otherwise RELIEF assigns clearly separated hues so neighbouring layers never look alike.
The frequency scale runs from 20 Hz to 20 kHz across 96 logarithmic bands, and magnitudes are pink-weighted: feed the plug-in pink noise or a log sweep and you get a flat line, the same convention as a mastering analyser. Levels are smoothed with a roughly 150 ms rise and 400 ms fall so the picture is readable rather than twitchy.
The ripple — density
A slow wave of light and dark travels through every layer. Its depth is that track’s density — its crest factor, the distance between its peaks and its average level: a strongly rippling layer is transient-rich and dynamic, a flat, still layer is dense and compressed. The legend prints the same figure in dB. It is the fastest way to spot the one track that has been squashed flat — or the one that is still too spiky to sit down in the mix.
Conflicts — hatching, bracket and lane
A contested region is shown three ways at once: inside the stack, each of the two layers is hatched in the other track’s colour; a bracket above the stack says in words which track is covering which; and the CONFLICT lane under the frequency axis draws severity as a curve, gold for mild, crimson for bad. The track this window is on is always called THIS TRACK: THIS TRACK covers BASS (in gold) means this window’s own Resolve is the fix; KICK covers THIS TRACK means the kick has to give way.
One conflict at a time. The worst conflict is the headline, drawn in full with a bold label. The others fade by how bad they are next to it; only the two strongest carry a label, and anything under a quarter of the worst is not drawn — the lane still shows everything. Once shown, the headline holds for at least four seconds, and another conflict takes over only if it has been clearly worse for a second and a half, so a single loud hit never steals it. Handover crossfades rather than jumping.
Fix it where you are. Click a bracket and a small panel opens: the pair, the frequency range, and the Resolve control of the track that has to give way. When that is another track, the panel turns that track’s Resolve directly — a plug-in cannot switch your DAW to another track, so the other track’s knob comes to you instead. The change is that track’s own: its automation lane and its undo record it, and if its RELIEF window is open, it moves with you. While the panel is open, the conflict stays put.
The display shows the mix as it sounds now, after Resolve, so turning Resolve up on the covering track visibly clears the conflict. Where this track is the one covering, the bracket also quotes how deep its Resolve is cutting there.
How RELIEF decides what is masking
RELIEF uses a psychoacoustic model of the kind audio codecs use to decide what the ear cannot hear, turned around to ask what one track hides in another. For every track it works out a masking threshold — the level below which anything else in that region of the spectrum is covered — and then checks each other track against it:
- Critical bands. The spectrum is judged on the Bark scale, in half-critical-band steps, the way the ear resolves frequency, rather than in equal slices of hertz.
- Upward spread. Masking reaches much further above a sound than below it, and further still the louder it is. A loud bass covers the low mids of a guitar where the bass itself has little energy — and Resolve then cuts the bass where that cover comes from, not where the guitar is.
- Tonal or noisy. RELIEF measures how predictable each part of a track’s spectrum is from one moment to the next. Noisy material — distorted guitars, cymbals, breath — masks far more than a pure tone of the same energy, and the threshold follows.
- Threshold of hearing. What would be inaudible in silence anyway is never treated as masked.
Three rules keep this musical. A track only gives way for content that matters to the other — close to its own loudest content once its natural slope is allowed for, not a filter skirt or a bit of bleed. Two tracks covering each other equally are left alone: cutting both would change nothing between them and just leave a hole, so that is a job for the faders. And nothing is gutted for a track buried so deep that even the full cut would not bring it back.
The EQ curve over the stack
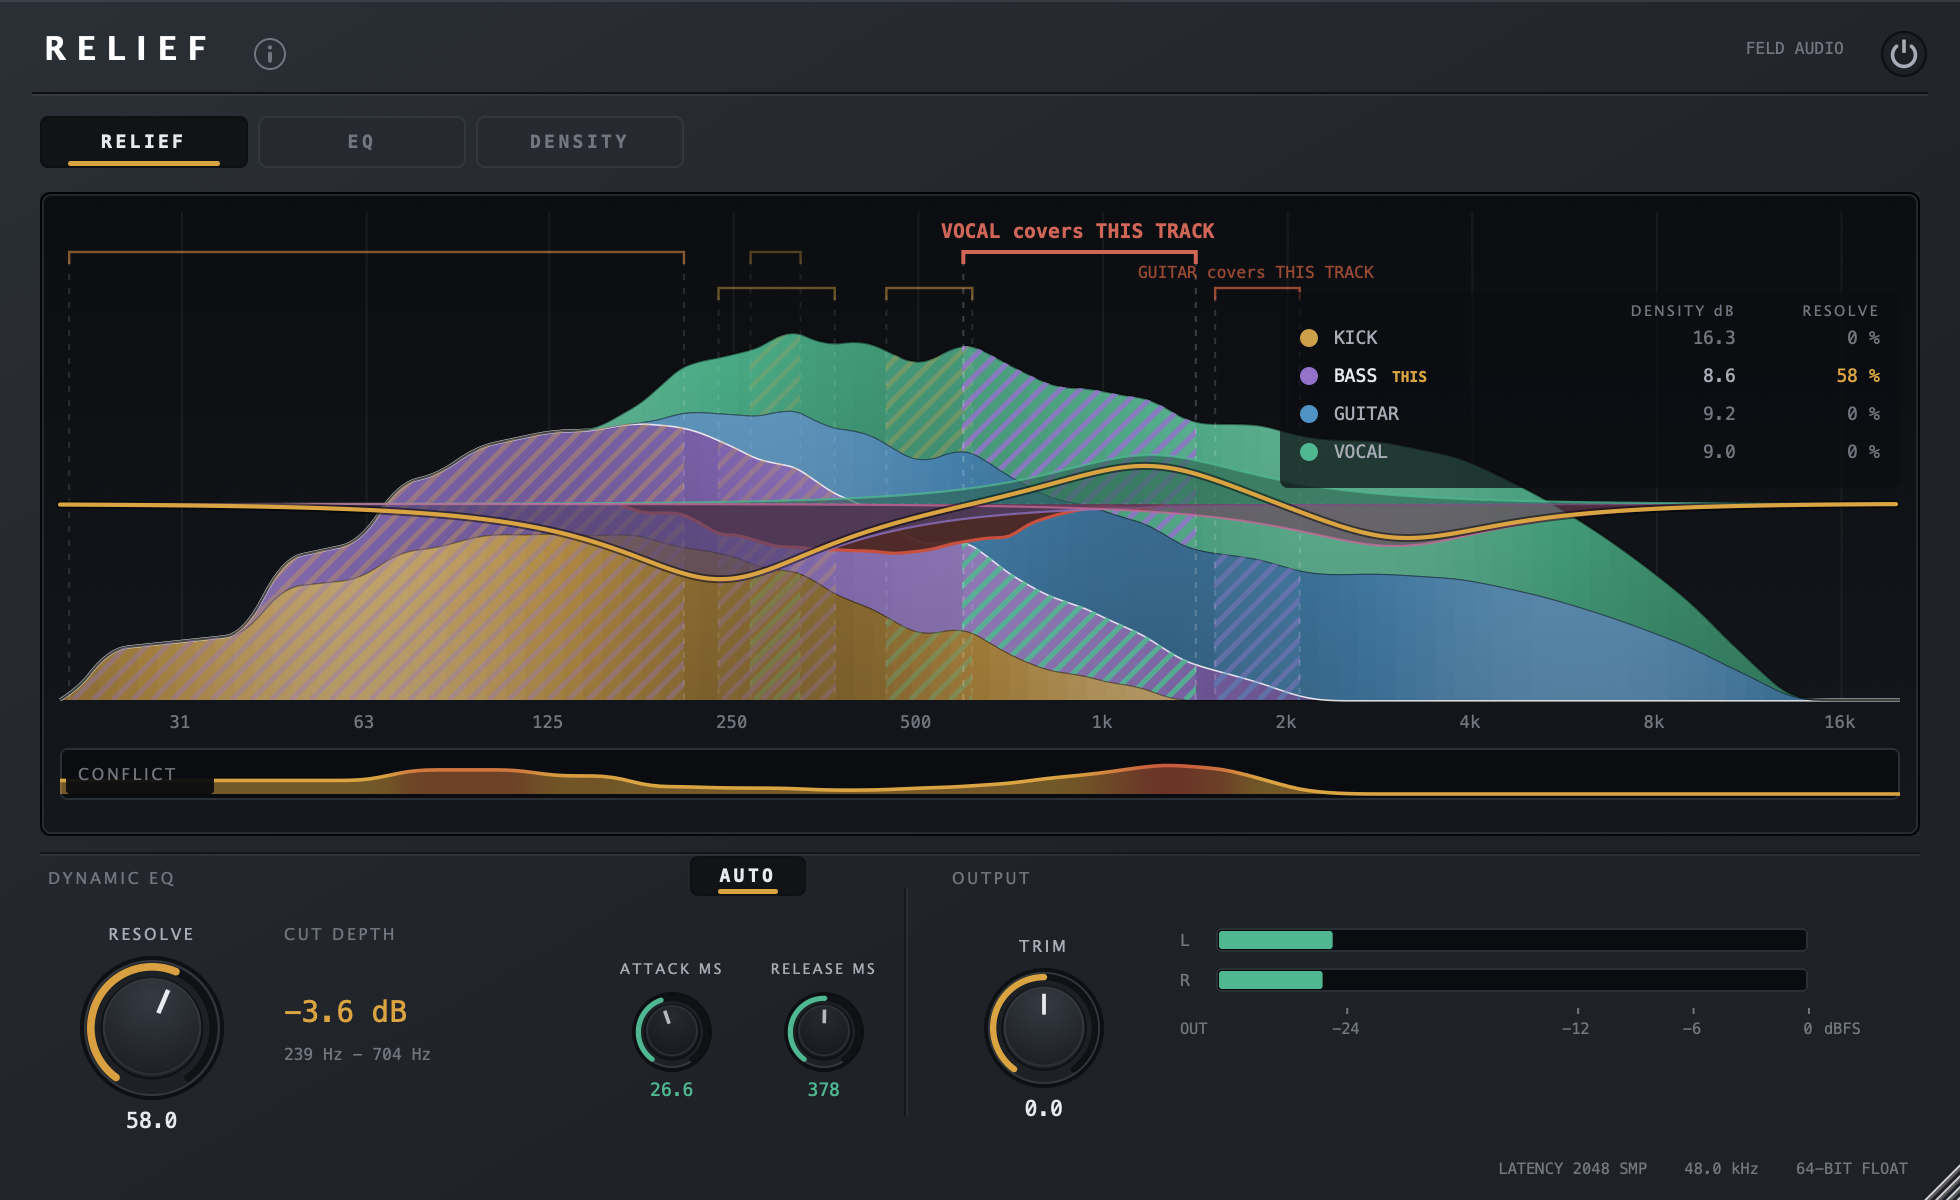
As soon as any of the six parametric bands is doing something, its curve appears over the stack in the RELIEF tab, drawn exactly as the EQ tab draws it: each band a translucent lobe in its own colour under the gold composite, against a dotted 0 dB line. A flat EQ leaves the picture alone entirely.
The live Resolve reduction is drawn there too, as the same filled crimson channel the EQ tab carves below the axis — and only across the frequencies actually being cut, so you can see at a glance how much is being taken out and where, without leaving the overview.
04The RELIEF controls

The density controls that used to share this row have moved to the DENSITY tab, where you can see what they do.
Automatic timing

AUTO reads two things: how fast the track’s spectrum is actually moving frame to frame, and how transient it is (the same density figure the legend prints). A busy, percussive track gets short constants — down to about 6 ms attack and 180 ms release — so the cuts move with the hits. A sustained one gets long ones, up to 60 ms and 700 ms, where the dips ride the arrangement instead of chattering with it. The values move slowly, over about a second, so the mode settles rather than chases.
This is how RELIEF arrives, because it is the right answer on most material and there is nothing to set up. Switch it off when you want the timing to be a deliberate choice — a bass ducking tightly around a kick, say — and the knobs hand you back whatever the analysis had settled on, which is a sensible place to start.
The extreme zone
At 75 % Resolve has done its job. Past it the knob enters a deliberately exaggerated range: the clearance it aims for rises from 6 dB toward 15 dB and cuts may deepen from 12 dB toward 24 dB. The ring around the knob turns from gold to crimson as you push into it, so you always know when you have left musical territory. It exists to make the effect obvious when demonstrating; for mixing, stay below it.
Header buttons

The circled i beside the name opens a short reminder of how the plug-in works. The power symbol at the far right bypasses processing; it lights red when engaged, and your DAW’s own bypass drives the same switch. Bypassing keeps the plug-in’s delay and its display running, so nothing shifts in time when you toggle it and you can A/B honestly.
05The EQ tab
The EQ tab dims the other tracks to the background, keeps your own track readable, and puts a six-band parametric EQ in front — for the deliberate, fixed moves you want to make by hand, alongside the automatic Resolve.
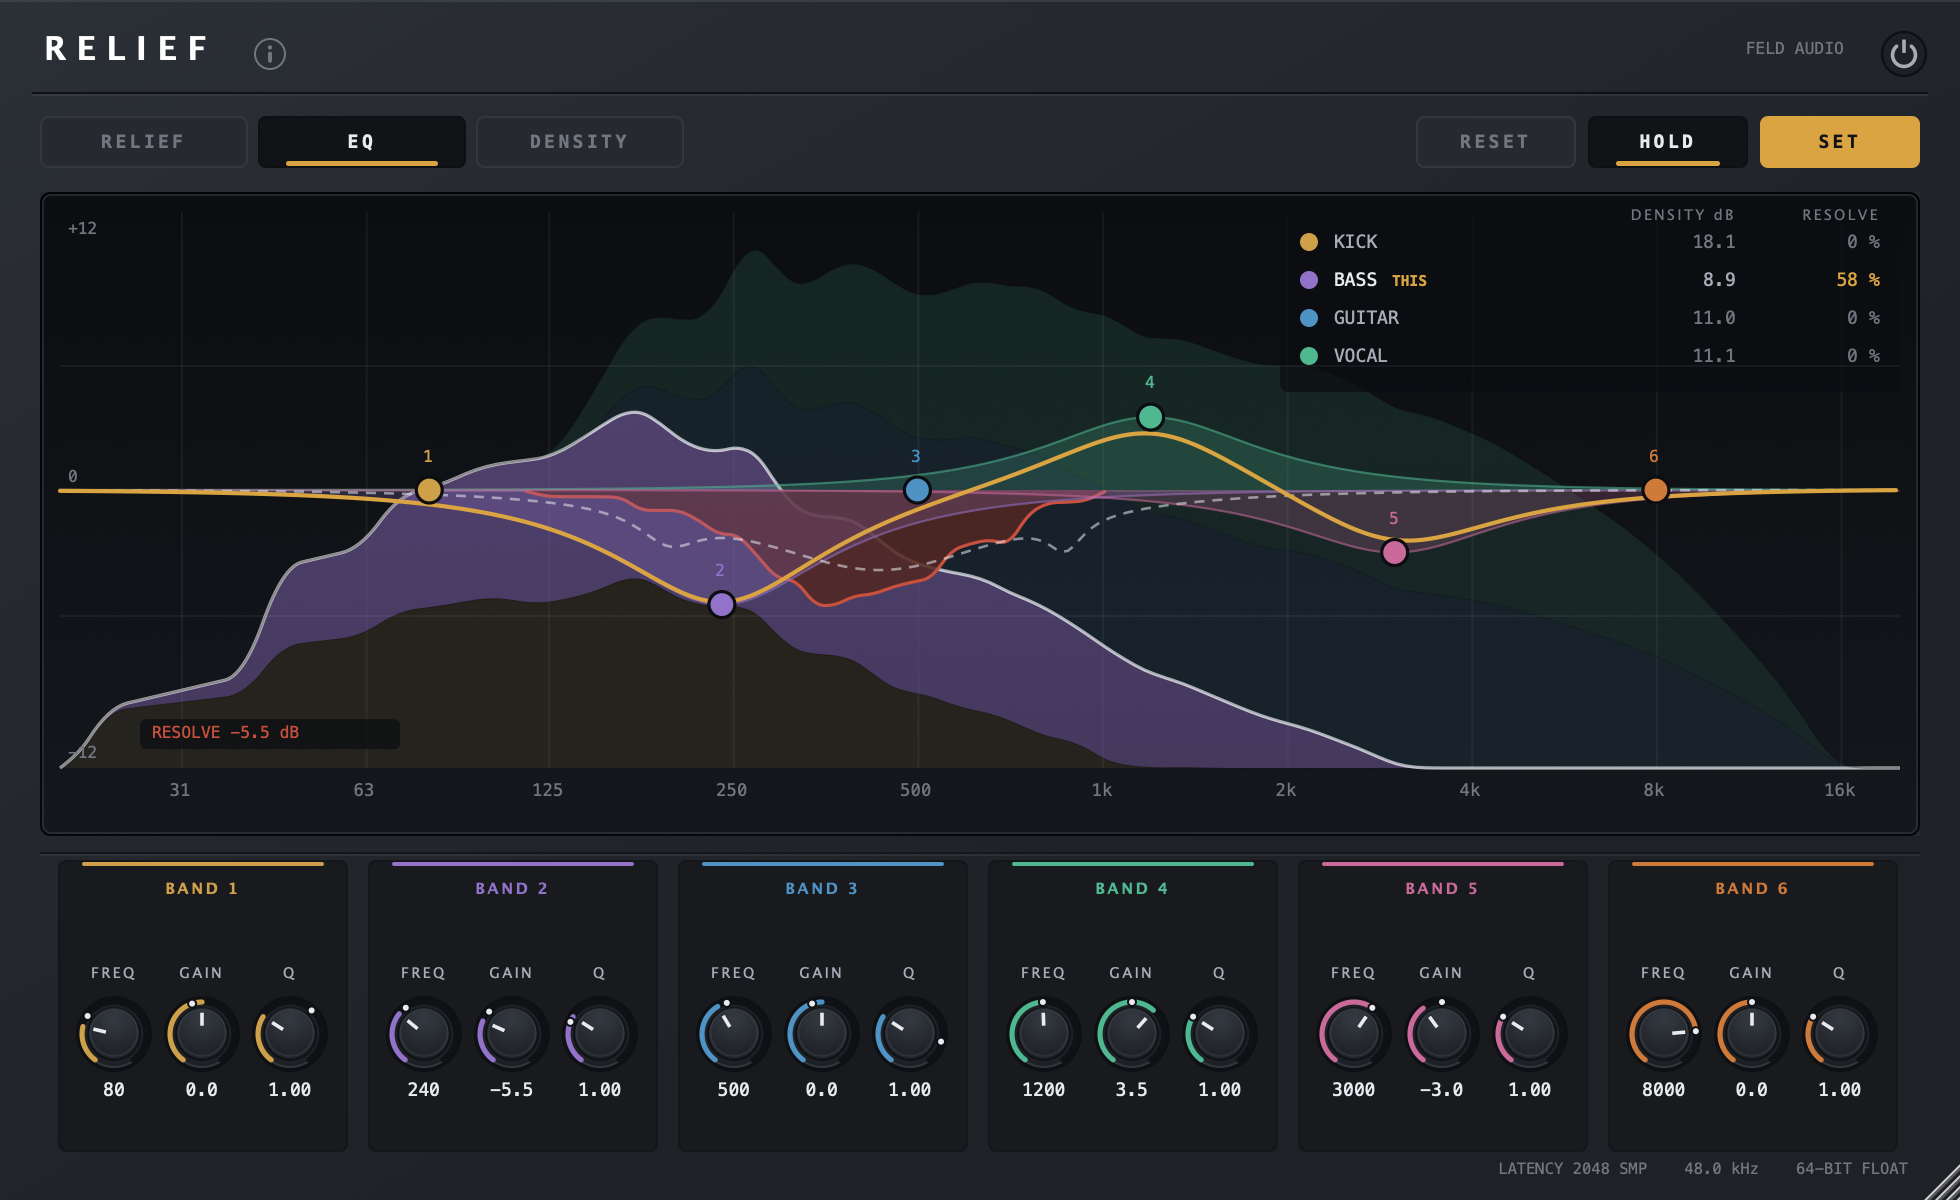
Each band owns a colour, and that colour is used consistently: the lobe it contributes to the curve, the handle, the numbered label above it, and the three knobs in its panel below all match, so you always know which control belongs to which bump. The scale runs ±12 dB around the centre line.
Recommendations, and how to take them
RELIEF continuously works out where this track collides with the others and proposes cuts for them — frequency, depth and Q derived from each conflict’s centre, severity and width. You see the proposal two ways: as the grey dashed curve, and as small dots on the knob rings showing where each knob would land. Nothing moves until you decide.
Play the loudest passage → let HOLD capture it → press SET → refine.
06The DENSITY tab
The DENSITY tab is about dynamics rather than tone. Every track gets a capsule on one 0–30 dB crest-factor scale — yours filled solid, the others outlined — with the session median as a dotted hairline and your target as a gold marker, so you can see at a glance whether this track is the dynamic one or the flat one in the group.
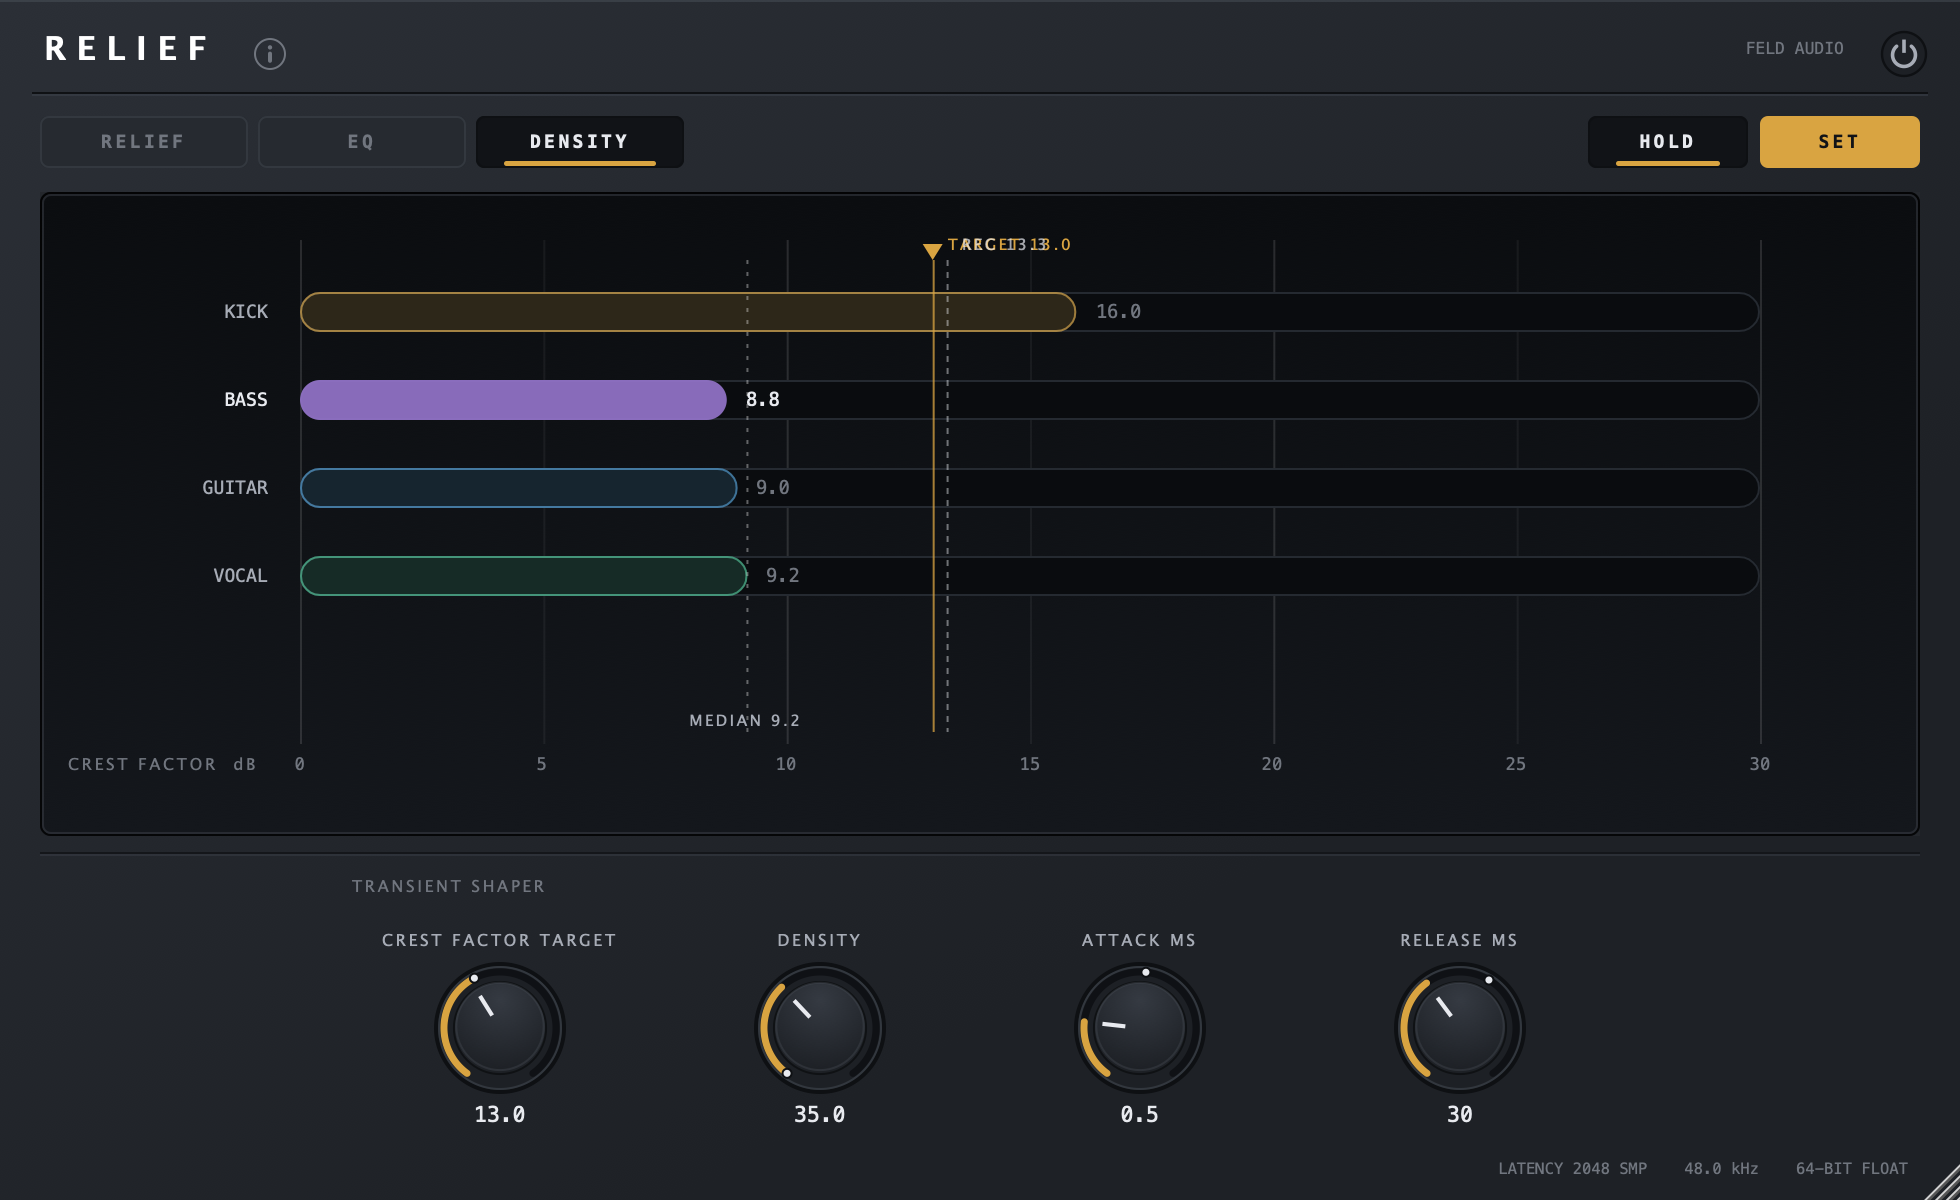
The recommendation aims this track at the session’s median crest factor — the middle of what your other tracks are doing — and chooses faster times when it needs to add punch, slower ones when it needs to calm a track down. HOLD and SET work exactly as they do in the EQ tab.
07Three recipes
Kick and bass sharing the low end
Put RELIEF on both. Play the section and watch the 60–200 Hz region: if it hatches and the lane rises, the two are stacking up. Raise RESOLVE on the bass to around 40–60 %, so the kick keeps its impact and the bass ducks around it only when the kick actually hits. The bass stays continuous; the low end stops flapping.
A vocal that keeps disappearing into the guitars
Instance on the vocal and on the guitar bus. Raise RESOLVE on the guitars, not on the vocal — you want the guitars to move aside. If you would rather commit to fixed cuts than let it move, open the EQ tab on the guitar bus instead, let HOLD watch a chorus, then press SET.
One track sticks out dynamically
Compare the density figures in the legend. A track several dB below the others is squashed; one several dB above has not been controlled. Open its DENSITY tab, press SET to aim it at the session median, and dial DENSITY back until it sounds natural.
08Demo & license
Until it is licensed, RELIEF runs in demo mode: an orange banner across the top with a countdown, and full processing for fifteen minutes of audio. The clock only runs while audio is actually playing, so browsing around with the transport stopped costs you nothing.

When the demo expires, processing stops and the plug-in passes audio through unchanged — keeping its delay, so your session’s timing does not jump — and an unlock button appears over the display.
Unlocking
- Click UNLOCK LICENSE. A small panel opens.
- Click BUY LICENSE to open the store in your browser, and complete the purchase. Your key arrives with the order.
-
Paste the key into the field — ACTIVATE lights up gold once there is something to activate — and click it. A key looks like
RELIEF-C3A11CCD-67B1...
The license is stored once at ~/Library/Application Support/FELD AUDIO/RELIEF/ and unlocks every instance, in every DAW, from then on. Activation is checked on your machine — no internet connection is required to use RELIEF once the key is in.
09Specifications
| Item | Value |
|---|---|
| Formats | AU, VST3 — universal (Apple Silicon & Intel) |
| System | macOS 11 or later |
| Channels | mono or stereo |
| Analysis | 2048-point FFT, 75 % overlap, 96 log bands |
| Frequency range | 20 Hz – 20 kHz, pink-weighted display |
| Latency | 2048 samples (42.7 ms at 48 kHz), reported to the host |
| Internal processing | 64-bit floating point |
| Masking model | psychoacoustic, after MPEG model 2: Bark scale in 0.5-Bark steps, level-dependent spreading, tonality from spectral predictability, threshold of hearing |
| Resolve cut depth | up to 12 dB (24 dB in the extreme zone) |
| Resolve timing | attack 2 – 200 ms, release 20 – 2000 ms, or automatic |
| Parametric EQ | 6 bands, ±12 dB, Q 0.3 – 8 |
| Density shaper | target 6 – 24 dB, attack 0.1 – 20 ms, release 5 – 300 ms |
| Instances per session | up to 16 sharing one display |
The analysis window is what makes the cross-track picture possible, and it costs 2048 samples of delay. Your DAW compensates for that on playback, so nothing drifts — but it is too much delay for monitoring a live performance through the plug-in. Track first, add RELIEF when you mix.
10Troubleshooting
Everything sounds slightly late or phasey
Your host’s delay compensation is not covering the track. In Logic Pro, set Settings → Audio → General → Plug-in Latency Compensation to All — the default setting does not compensate busses. In Ableton Live, check that Options → Delay Compensation is on. Also make sure the track is not record-armed with input monitoring, which bypasses compensation by design.
Recording one track’s output into another through internal routing captures the source chain’s latency — that is how both Logic and Live work, and it will always look late. To check alignment honestly, duplicate a track, invert the polarity of the untreated copy with a gain or utility plug-in, and listen at the master: correct compensation nulls it to near silence.
The plug-in does not appear after installing
Restart the DAW rather than only rescanning. In Live, hold Option while clicking Rescan to force a full scan instead of an incremental one.
Resolve seems to do nothing
Check three things: that more than one instance is running (the legend shows them all), that you are not soloing, and that Resolve is up on the track doing the covering — the one named first in the bracket. The covered track is deliberately left alone. Clicking the bracket takes you straight to the right control, and the CUT DEPTH readout beside the Resolve knob tells you whether it is working.
Only one track appears in the stack
Instances share their analysis within one host process. If your DAW is configured to run plug-ins in separate sandboxed processes, they cannot see each other — switch that option off for RELIEF.
RELIEF — Feld Audio · This guide covers version 0.4.0 · Screenshots show four instances on kick, bass, guitar and vocal.